Bûche de Noël (Yule Log Cake)
A French Christmas cake tradition -- this recipe and video tutorial show you how to make a beautiful Yule Log cake.

Recipe of the Day
Discover a New Recipe Every Day. Give Back With Every Bite.
Every day, we feature a hand-picked recipe for you to discover, cook, and share. The best part?
Every recipe you read helps feed the hungry.

I have always loved Christmastime and not just because of the tree and presents and holiday cheer, but largely because there are so many wonderful food traditions that come with it and I just can’t pass up a good festive baking project. The Bûche de Noël, though, is one holiday cooking tradition I come back to time and time again — every single year, in fact. I’d go so far as to say it’s my very favorite thing to make during the Christmas season and that’s because it’s fun to make, impressive to look at, and delicious in the end. It’s a beautiful cake that’s much less complicated than it looks and only takes a few simple tips and tricks to master.
The video below will take you through every step.
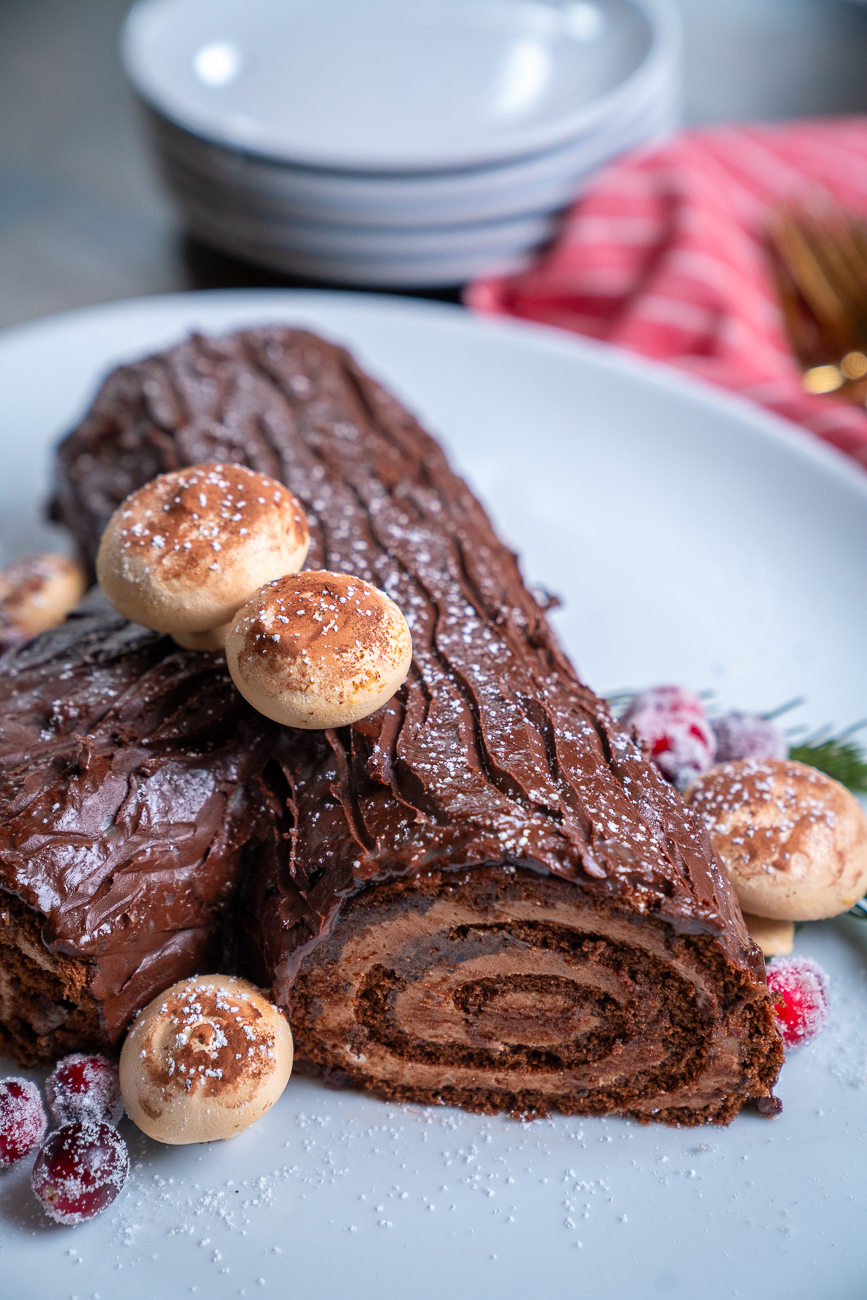
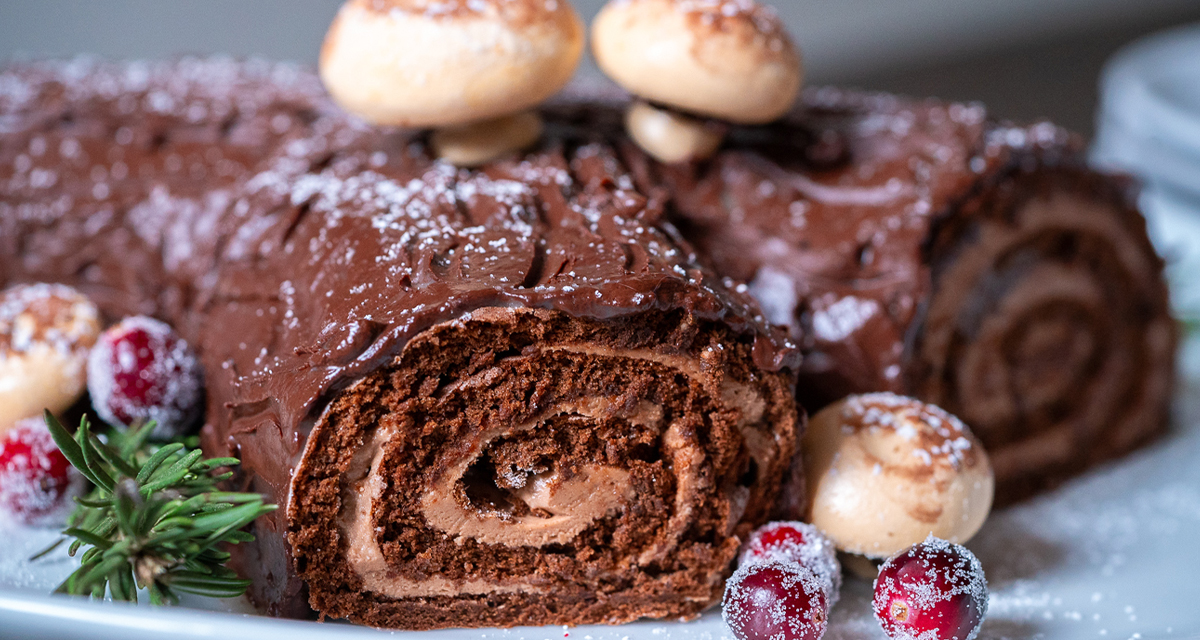
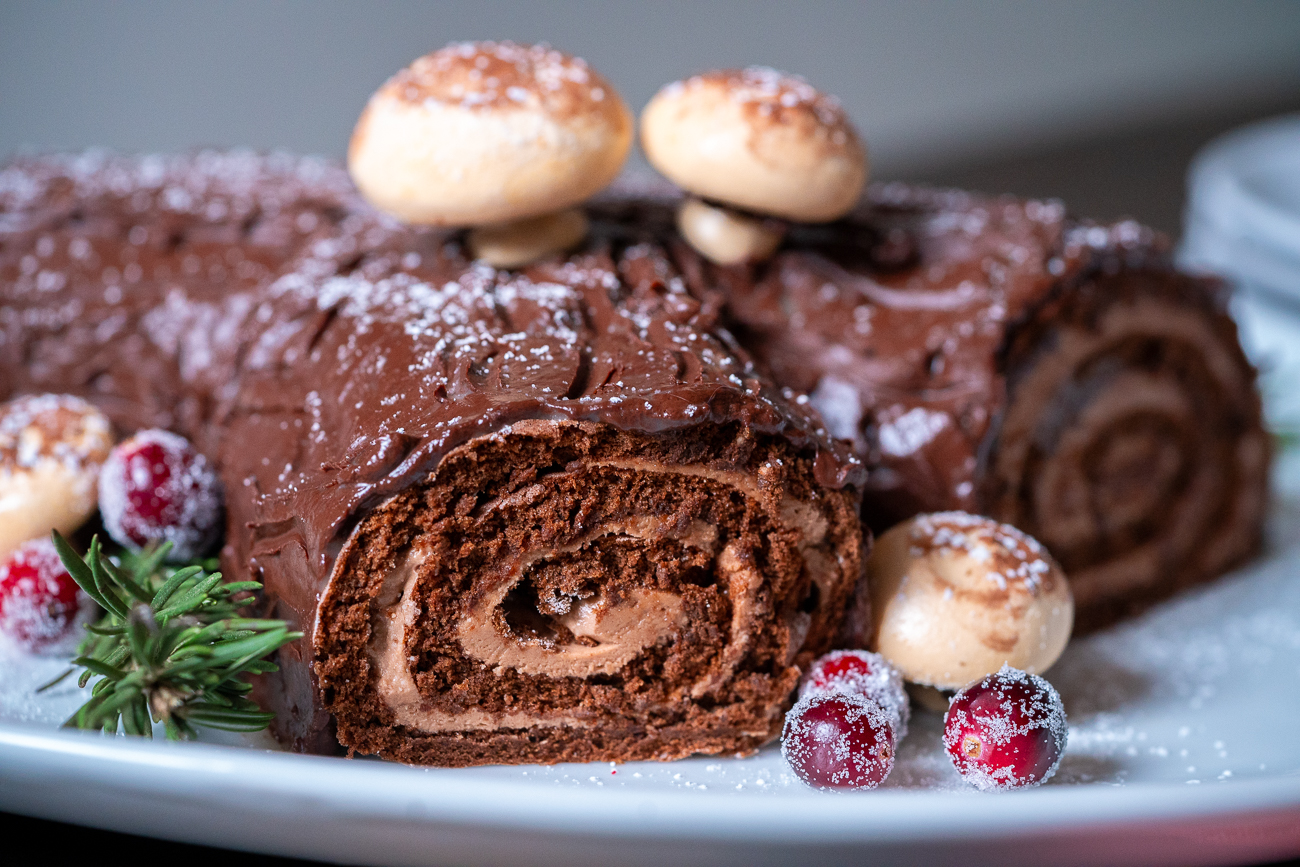
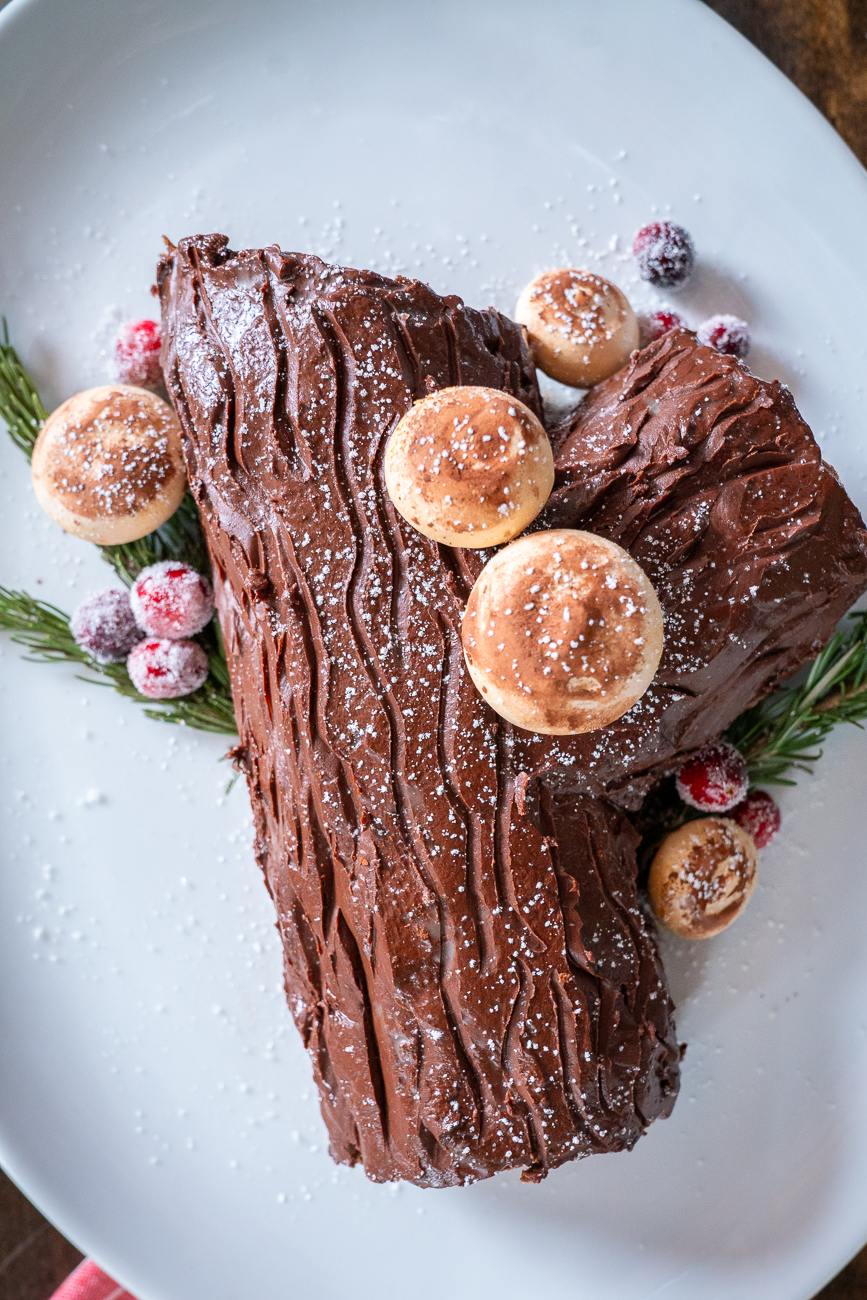
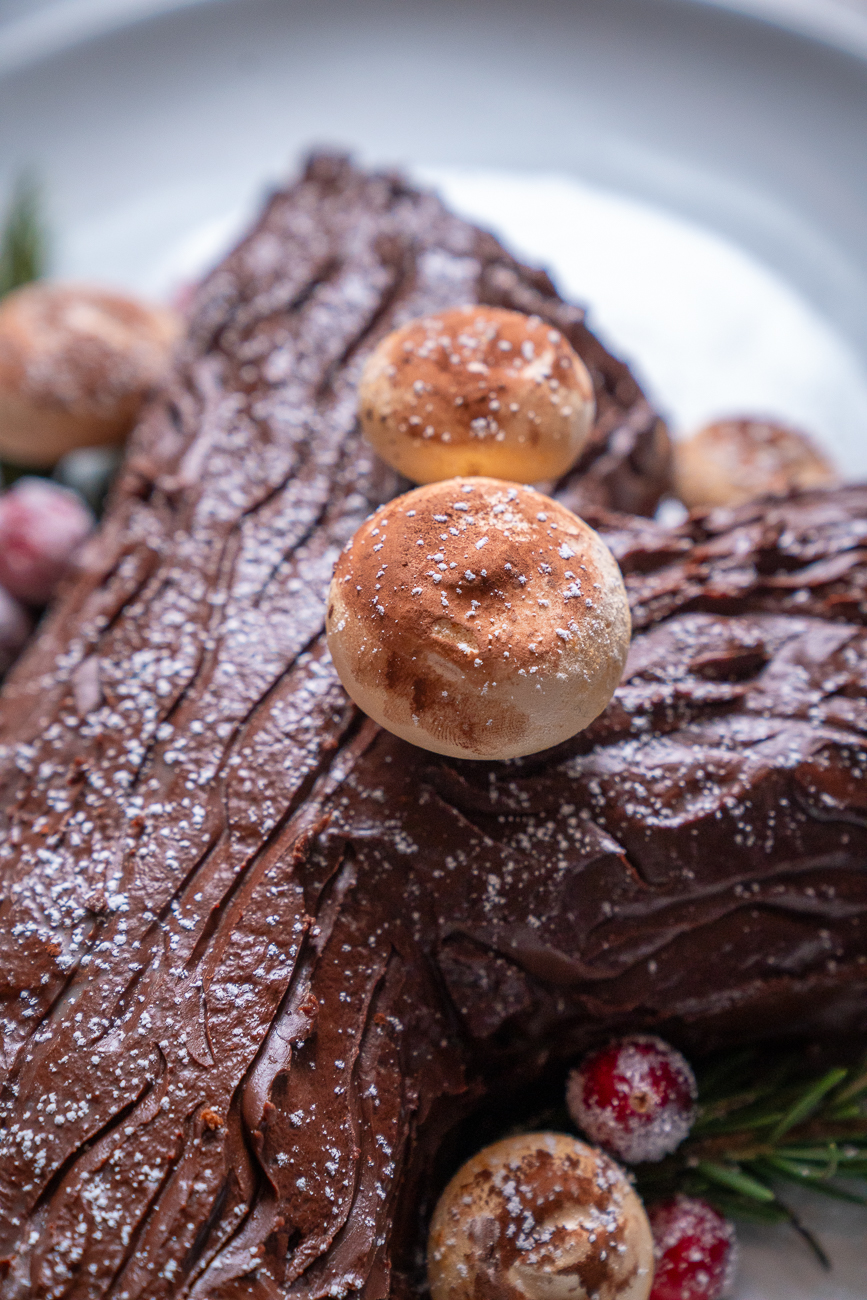
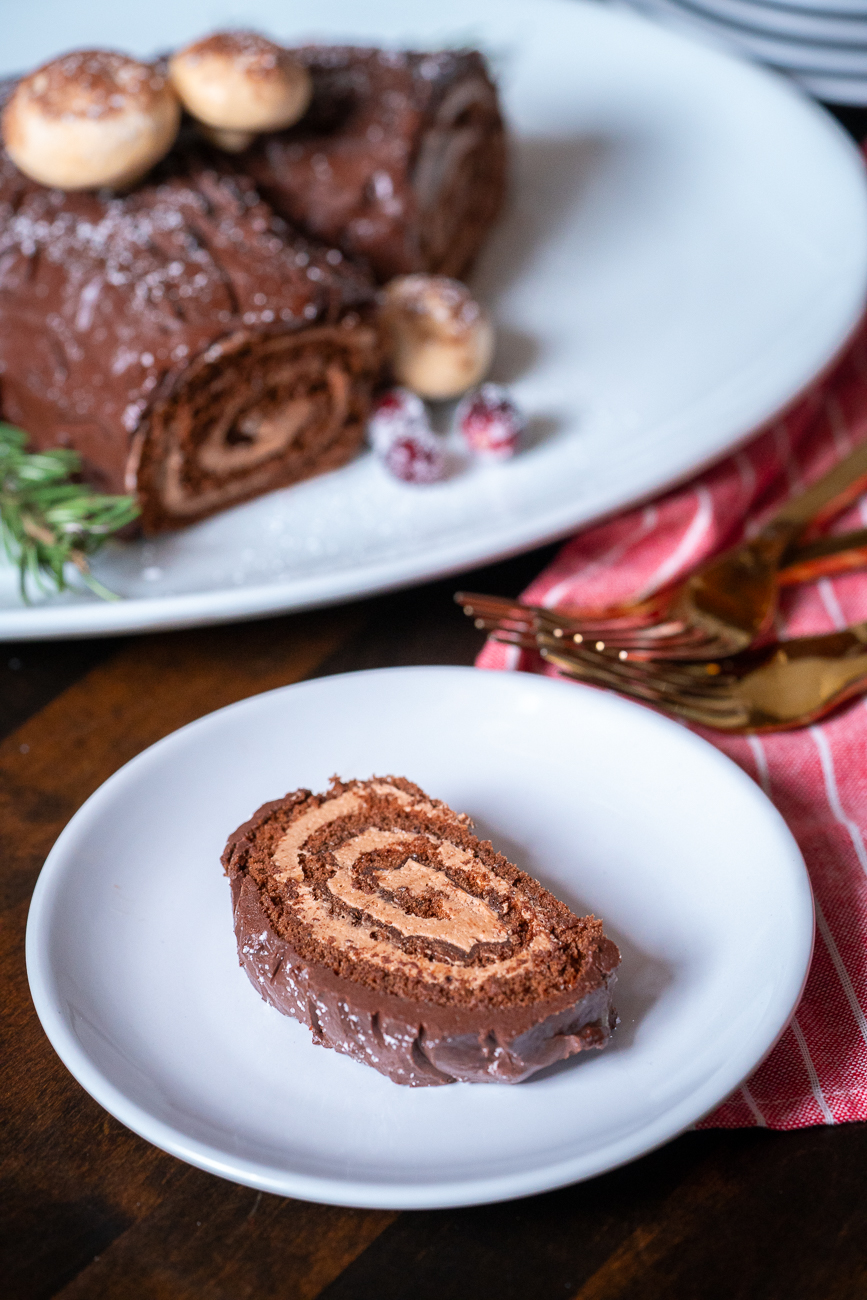
The first question is what is a Bûche de Noël? Well, it’s just a rolled cake that’s meant to look like a Yule Log, simple as that! It’s a traditional Christmas cake that originated in France, but is seen in many other countries now. It’s traditionally made with a genoise cake, which is a French sponge cake made with whole eggs and then rolled with a filling such as buttercream frosting and finally coated with another layer or icing, frosting, or ganache that’s often made to look like bark. And then, of course, there are countless options for decorations, like meringue mushrooms, a simple dusting of powdered sugar, chocolate shavings, sugar-dusted cranberries, or even some holly or evergreen sprigs. It’s like a craft project and a cake in one, and that’s probably why I love it so much.
You actually want to start by making your frosting because the cake bakes so quickly and you’ll need to start working with it while it’s still warm (rather than spending that time working on filling or frosting).
What kind of filling? I like a basic buttercream frosting here because it doesn’t require any cooking or special steps and is sturdy enough to stand up to being chilled overnight if the cake is made ahead. A whipped cream filling doesn’t work as well as it begins to weep into the cake after a while. I like a chocolate on chocolate flavor for my Bûche de Noël but you can play with the flavor profiles as you wish — yellow cake with chocolate filling, chocolate cake with vanilla buttercream, chocolate cake with peanut butter buttercream… these are all things that work.

Once your frosting is done, just set it aside while you work on the cake. It will keep fine at room temperature for the next twenty minutes or so unless your kitchen is exceptionally hot. The key to the sponge cake is beating whole eggs and sugar until they’re fluffy and light in color. This should take about three minutes and you really want to see the consistency change to an almost ribbon-like one, so set a timer if you need to. This aerates the cake and adds pliability, which you’ll need for rolling.
Pour the batter into a jelly roll pan that’s been brushed with melted butter, lined with parchment paper, and brushed with butter again. There’s no need to spread it to the edges if it doesn’t reach, but do spread it out evenly and tap the pan on the counter a few times to break all the larger air bubbles (but not the tiny ones, so don’t overdo it with the tapping). Bake until you see the cake start to pull away from the sides, which should just take eight minutes or so. Watch your cake carefully — you don’t want to overbake or you’ll have a dry cake that cracks when rolling.
The next step seems a little odd, but just go with it. Dust a clean kitchen towel liberally with powdered sugar in an area that’s larger than your cake pan. Then, while the cake is still very much warm, flip the cake onto the powdered sugar coated area and then carefully remove the parchment paper. It’s scary, but it usually works out just fine! Dust the cake with powdered sugar and, again while the cake is still warm, roll it up into a spiral log, using the towel to help you along the way. It’s very important the cake is warm here — it’s more pliable at this time and it helps the cake to “remember” the shape it’s meant to be in. This gives you your best chance of preventing cracks.
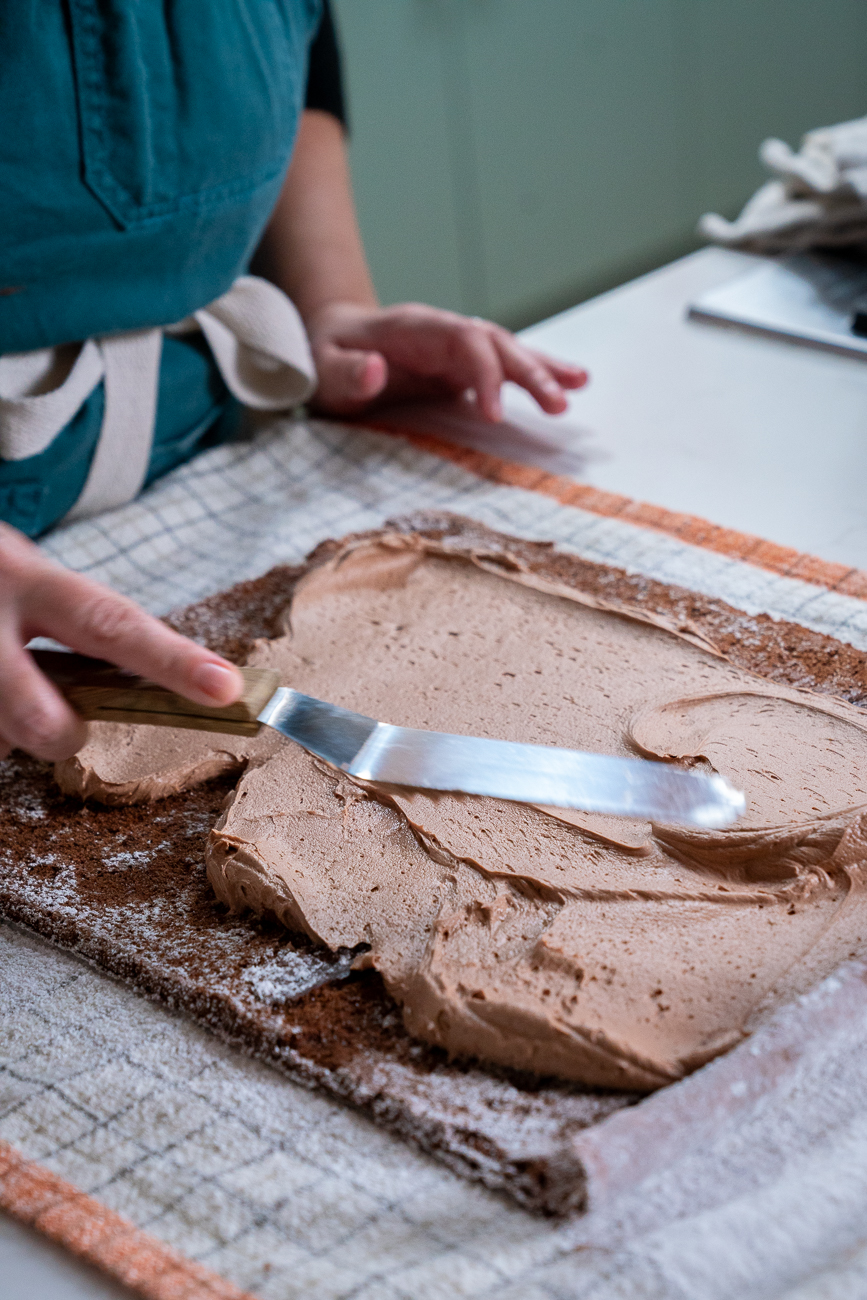
Let the cake cool wrapped up in the towel in its log shape, and then gently unroll it and spread it with the buttercream filling. You can take it pretty much edge to edge and don’t need to be too heavy-handed with the amount of filling as the spiral shape will give you plenty in each bite. Wrap the log in plastic wrap and then chill it for at least two hours until it’s firm. You can chill it overnight if you need to, which makes this a great make ahead option.
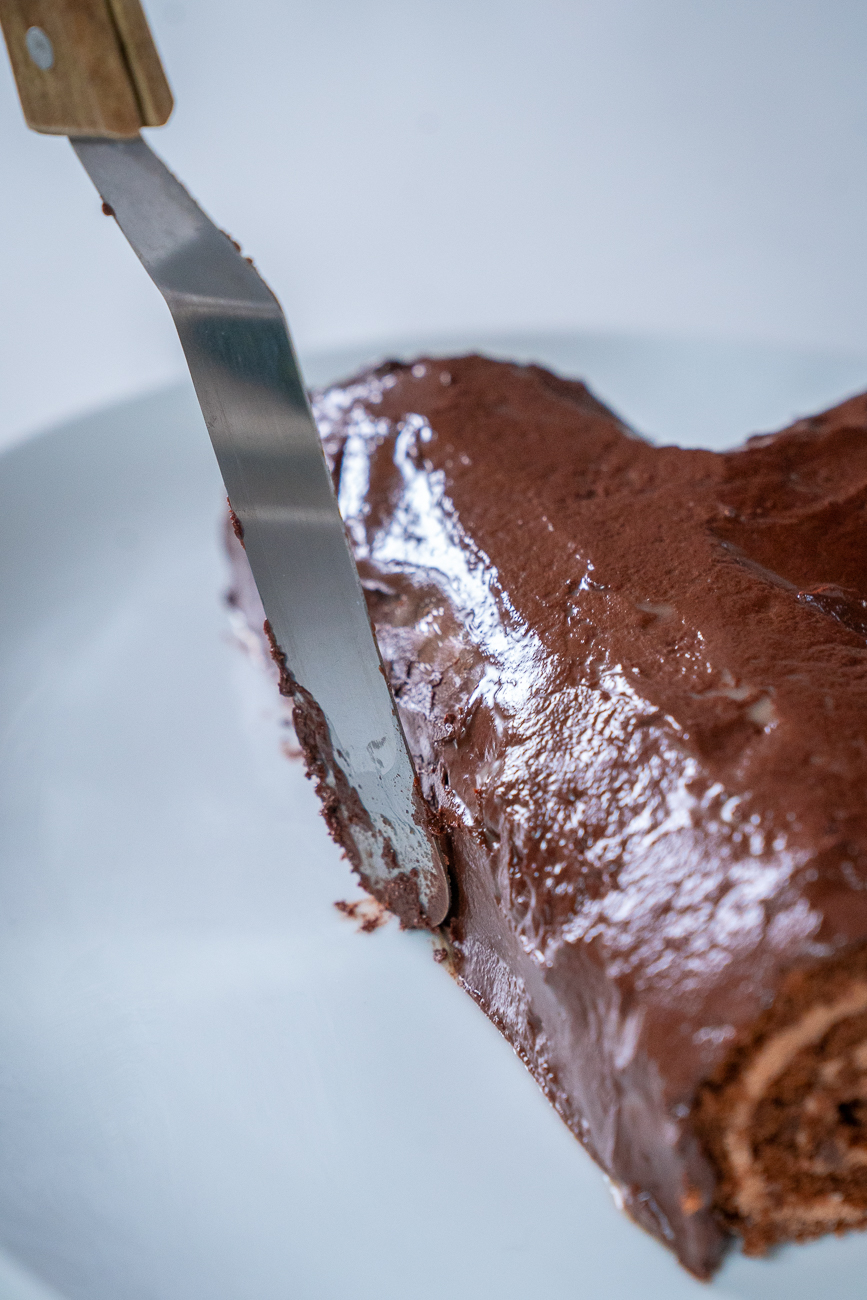
Once the cake is firm, you can frost it, which I like to do with ganache. The cake is light, the filling is creamy, and I find that a fudgy ganache is the perfect way to bring it all together. I like to use a very simple method here of pouring some hot cream over chocolate chips and then stirring them together until the chocolate has melted. If your ganache is too runny to use at first, that’s fine, it will thicken as it sits so just let it rest until you have an easier consistency to work with. (You can even pop it in the fridge briefly to speed things up.)
Spread the ganache all over the log, attaching an angled slice on the side to make it a more believable branch, if you wish. Then I like to drag the tip of a knife through the ganache to create woodgrain lines. It’s very easy to do and doesn’t take any special skill, but looks so lovely in the end.
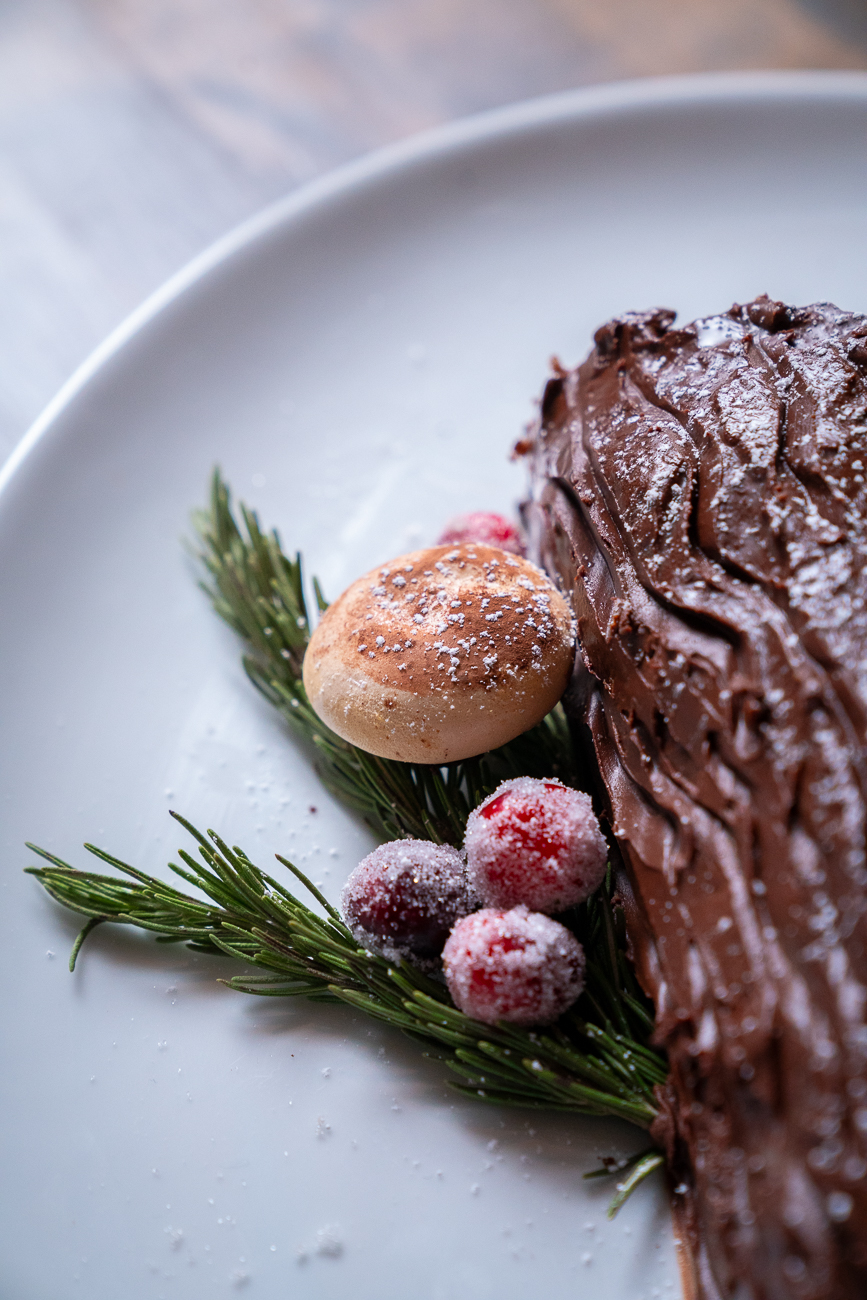
You don’t need to get particularly fancy with decorating the rest if you don’t want to, but I find that a dusting of powdered sugar lends some nice winter vibes and I generally can’t resist making some meringue mushrooms to go along with it. At this point, you can hold the cake in the fridge again if you need to, but I would hold off on your final decorations until you’re ready to serve it. (Meringue and powdered sugar sprinklings don’t hold up too well in the fridge.)
To see how to make the Meringue Mushrooms, click here: Meringue Mushrooms.

Bûche de Noël (Yule Log Cake)
Watch How It's Made
Video unavailable — your ad blocker may be preventing it from loading.
For the frosting:
- 1/2 cup (1 stick) unsalted butter, at room temperature
- 1/2 cup chocolate hazelnut spread (like Nutella)
- 1 3/4 cups powdered sugar
- 1/4 teaspoon salt
- 2 tablespoons heavy cream
- 2 tablespoons Frangelico or other hazelnut liqueur
For the sponge cake:
- 2 tablespoons butter, melted
- 1/2 cup unsweetened cocoa powder
- 2 tablespoons all-purpose flour
- 1/2 teaspoon salt
- 5 large eggs, at room temperature
- 2/3 cup granulated sugar
- 1 teaspoon vanilla extract
- Powdered sugar, as needed
For the ganache frosting:
- 1 (8 oz) package dark chocolate chips
- 1 cup heavy cream, heated to scalding
For decorating (optional):
- Cranberries
- Powdered sugar
- Cocoa powder
- Fresh rosemary
Preparation
- Preheat oven to 400°F.
- First, make the buttercream frosting:
- In a mixing bowl and an electric mixer or the bowl of a stand mixer, beat the butter and Nutella together until creamy, scraping the sides of the bowl a few times, about 2 minutes.
- Reduce speed and add the powdered sugar, salt, heavy cream, and hazelnut liqueur and mix until mostly combined.
- Increase speed to medium-high and whip until fluffy, about 2 minutes. Scrape down sides of bowl occasionally. Set aside.
- Next make the cake:
- Brush a 12x17-inch rimmed baking sheet with some of the melted butter. Line pan with parchment paper, then brush paper with remaining melted butter. Set aside.
- In a small bowl, whisk together cocoa powder, flour, and salt until no clumps remain.
- In the bowl of a stand mixer or a large bowl with an electric mixer, whip the sugar and eggs until fluffy and thick, and light in color. This will take bout 3 minutes.
- Add vanilla and half of the cocoa powder mixture. Mix on low until combined. Add remaining cocoa mixture and mix on low briefly. Increase speed to high, and mix until cocoa powder is moistened but not fully blended.
- Remove whisk attachment and use it to stir gently by hand until mixture is evenly combined.
- Pour batter into prepared baking pan, and gently spread out with a spatula. Batter doesn't need to reach the edges of the pan. Pick up pan with two hands and tap on the counter a few times to remove larger air bubbles.
- Bake until the edges of the cake start to pull away from the pan, 8-10 minutes. Do not overbake.
- While cake bakes, liberally sift powdered sugar onto a clean kitchen towel. The sugar should cover an area larger than the cake.
- Remove cake from oven and run a knife or offset spatula around the edges of the pan. Dust top of cake with powdered sugar.
- Quickly flip pan onto the powdered sugar coated towel. Carefully peel away parchment paper, then dust cake again with powdered sugar.
- Using the towel to help, roll cake up into a log. Do this while cake is still warm. Let cake rest 15 minutes.
- Gently unroll the cooled cake. Dollop cake with buttercream frosting, reserving 1/3 cup or so for later use, then spread out with an offset spatula to the edges.
- Roll cake into a log once again, using the towel to help as needed.
- Sprinkle log with powdered sugar, then wrap cake in plastic wrap and chill until firm, at least 2 hours.
- To make the ganache frosting:
- Place chocolate chips in a medium bowl, then pour hot cream over the top. Let sit 1 minute, then whisk until chocolate is smooth and melted. Set aside.
- Cut a slice from the cake log at an angle, about 3 inches in size. Using the reserved buttercream, attach the angled "branch" piece to the side of the log. Smooth out the joint with more buttercream as needed.
- When ganache has cooled enough to thicken up and not run off cake, pour or spread over entire "log" except for the swirled ends. If needed, chill to further firm up the ganache.
- Using the tip of a knife, drag through ganache to create bark lines. Chill until ready to serve.
- When ready to serve, decorate with sugared cranberries, rosemary, powdered sugar, or meringue mushrooms, if desired. Enjoy!