Halloween Dessert Recipe: Spooky Cake Pop Witches

Okay, we found the perfect Halloween treat that wonderfully encapsulates the holiday spirit — it’s a smidge labor-intensive, but so worth it when you see the adorable result and the joy on all the kids’ faces! (We’re assuming children will be eating them, but fact is everyone will go crazy over this treat!)
The cake pops themselves are super easy to make, it’s just the decoration that takes some time; if you decide to change strategy and go for a slightly more stream-lined approach, fine by us, they’ll still be super cute. Also, if you’re okay with loosening the reins in the kitchen, go ahead and get the kids involved. It’s a great afternoon activity and they get to see the fruits of their labor and create spooky treats!
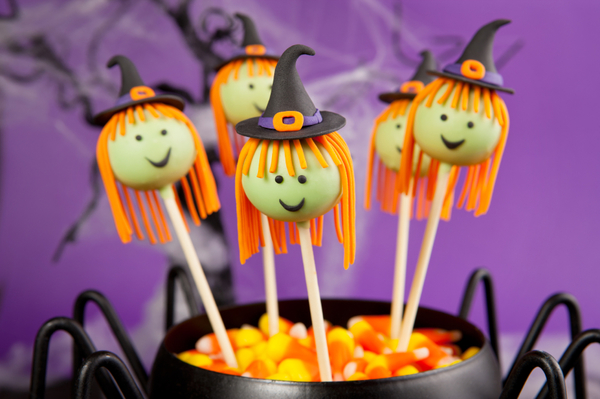
Cake Pop Witches
Yields 4 dozen
Ingredients
- 1 (18 oz.) package cake mix (vanilla, chocolate, red velvet, etc.)
- 1 (12 oz.) package white chocolate chips
- 3/4 (16 oz.) tub vanilla or cream cheese frosting
- 1 tablespoon vegetable shortening
- 1/2-1 package ready-to-use white fondant (Wilton White Decorator Preferred Fondant, 24 oz.)
- food coloring (green)
- icing coloring (black, orange, purpleor primary colors to make your own)
- lollipop sticks
- parchment paper
- 2 pieces of thick Styrofoam
Directions
- Bake your cake according to packaging directions and let cool completely. (Or make cake the night before.) Divide it into quarters and put the first quarter into a large bowl. Using two forks, begin crumbling your cake and breaking it down. Once you finish that quarter of cake, add the next quarter to the bowl and repeat with other sections.
- Once all of your cake is finely crumbled, spoon 3/4 tub of frosting into the bowl. Using your hands or continuing with your forks, incorporate the frosting until no more white is visible and it’s completely blended in. Using a small ice cream scooper (or just your hands), form walnut-size balls out of the cake and set on a parchment-lined baking sheet. Place in freezer for 30 minutes, or until very firm.
- Set up a double-boiler with a heat-proof, glass bowl set over a saucepan, 2 inches full of water. Place white chocolate chips in the glass bowl and cook over low heat, stirring until chocolate is completely melted. Add in vegetable shortening and 2 drops green food coloring, stir well and incorporate fully.
- Take your cake balls out of the freezer and insert lollipop sticks into the bottom of them. Dip or roll your cake balls in the green chocolate, paying close attention to the spot where the cake meets the stick. Firmly press the lollipop sticks into the Styrofoam in order for the cake and frosting to dry standing up. (Or you could dry on the parchment paper, but that will flatten them out a little.)
- Take your fondant and divide it into 3 sections; these will be different colors (black, orange and purple). Roll each section into a small ball and use a toothpick to dab spots of color on it. Red and yellow to make your orange fondant, red and blue for your purple. Knead balls of fondant until the color is fully absorbed and there are no streaks. Once you get the right colors, roll your orange fondant out to about 1/8th-inch thickness and cut into thin strips. Roll these strips slightly so they are just rounded.
- Cut the orange strips into 2-inch pieces, take 10 pieces and arrange them to look like hair on top of your cake ball witches. Cut several smaller pieces for the bangs. With your black fondant, divide the ball in 2 sections: one (small) section for the noses and mouths, one (large) section for the hats.
- For the hats, roll out approximately 48 flattened discs and place on top of the hair you created. These are the bases of the hats. Continue with the black fondant and create 48 mini cones. Using the tips of your fingers, bend the ends of the cones to look like the top of an old hat. Place these on top of the flattened discs.
- Roll out a thin amount of purple fondant (1/8-inch thickness) and cut into 48 thin strips (just like you did with the orange fondant). Cut into smaller pieces and wrap each mini rope around the base of your witch’s hat. Take a mini orange rope and create a buckle-like square to go on top of the purple band. Press gently so it adheres.
- Roll out thin, curved strips of black fondant to create mouths for the witches and place two black dots of fondant on their faces for the eyes.
- Serve and enjoy!
Recipe adapted from the Pioneer Woman