
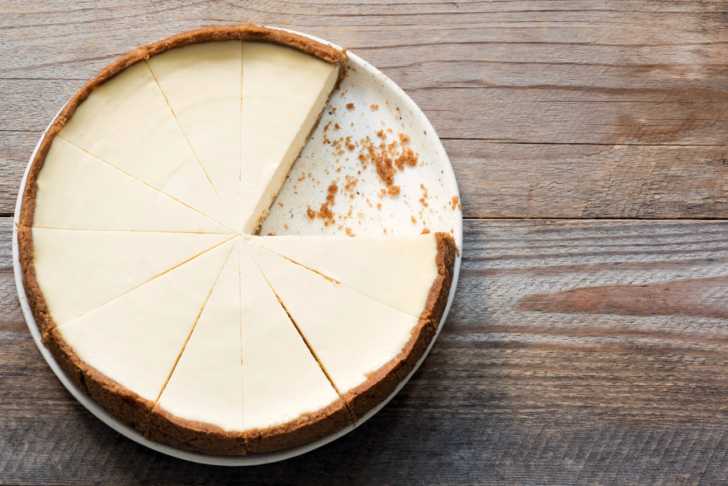
Is it just us, or is the cracking of cheesecake a phobia that plagues home cooks everywhere?
It can seem like you’ve followed a cheesecake recipe to a T, done absolutely everything right, and yet when you go to serve your masterpiece you’re met with cracks across the surface. Utter devastation.
Those cracks can seem to come out of nowhere and so cheesecake might appear to be a finicky dessert to create, but really, if you just follow a few simple rules, you can get a perfect cheesecake every single time. Pinky promise.
Most of the issues with cheesecake come with “over-doing” something. Over-baking, over-beating, over-cooling (letting it cool down too fast)… you get the picture. Just follow our simple cheesecake rules, and you’ll never have to worry about cracks again!
Our Cheesecake Rules:
1. Keep It Low. (And Give It A Bath.)
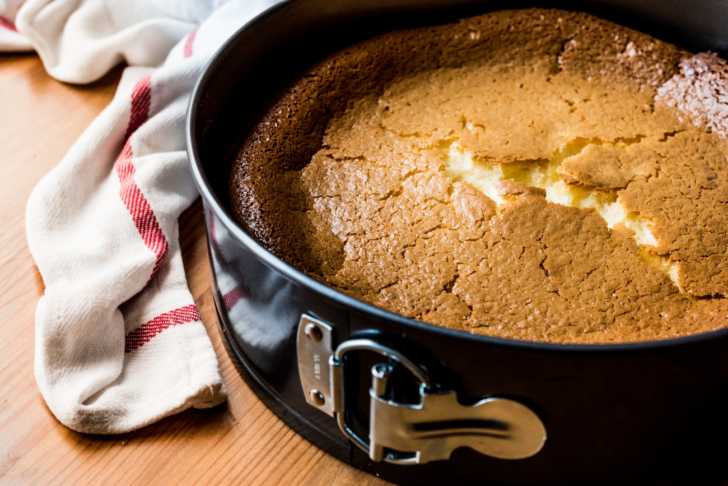
High temperatures can cause cheesecakes to crack, so never try to speed things up by increasing the temp of your oven. Most recipes will call for baking somewhere between 300°F and 325°F and you should listen to them. This is also the reason for the ever-enduring water bath. It helps the cheesecake heat up gradually and bake more evenly. When it comes to cheesecakes, a water bath is a great piece of insurance. Just set your springform pan in a larger pan, and fill the outer pan with hot water until it comes halfway up the sides of the cheesecake pan. See? Simple.
2. Just Beat It. (A Little Bit.)
Cheesecakes use a fair number of eggs, which means that if you beat the batter too much, you’re going to aerate it. If you over-beat the batter, the cheesecake will puff up in the oven, and then fall and crack as it cools. So beat it only as much as you need to. Use a paddle attachment rather than a whisk, and make sure you’re starting with softened cream cheese so it mixes in easily.
3. Don’t Over Bake.
Knowing when to remove a cheesecake from the oven can be a bit daunting, but resist the urge to leave it in until it looks firm or dry. While the batter shouldn’t be splashing around at the end, you want to take it out while it’s still a little jiggly. It will set up as it cools.
4. Grease It Up.
Shrinkage is inevitable. As a cheesecake cools, it will condense in size a bit. Greasing the pan means that as that happens, the cheesecake won’t cling to the sides and then crack. If it can easily detach from the pan, the cake can cool and shrink as a whole.
5. Cool it. (Slowly.)
Nobody wants warm cheesecake, and it sets as it cools, so cooling it down is simply part of the game. You just don’t want to do it too fast. You can cool it in a turned-off oven with the door open, you can put a large bowl over it to keep it reasonably warm, but you’re probably fine just setting it in a non-drafty location. Just don’t do anything crazy like going straight from the oven to the fridge.
6. If All Else Fails, Hide It.
You know what they say: “An ounce of prevention is worth a pound of cure.” If you followed rules 1-5, you shouldn’t ever have to use this tip, but if something went awry and you still end up with a cracked cheesecake you can always do a little bit of disguise work. You can coat the top with berries or whipped cream, or simply slice it and serve it before anyone notices, but our favorite method is a delectable sour cream topping. (It’s a totally worthy topping even if you’re not trying to hide anything, by the way.) Just mix together 2 cups of sour cream, 1/4 cup of sugar, and a teaspoon of vanilla, spread it over the cheesecake, and pop it back in the oven for a bit. You can find the full instructions in this cheesecake recipe.
Now, that wasn’t so hard, was it? Follow these simple rules and you’re well on your way to cheesecake greatness.
These tips will work with your favorite cheesecake recipe, but here’s one of our favorites: Judy’s Cheesecake.